A riser diagram is a simplified vertical schematic that shows the relationship and routing of mechanical, plumbing and electrical services through building floors; it is fundamental because it clarifies system hierarchy, connection points, and space coordination for design, installation and maintenance.
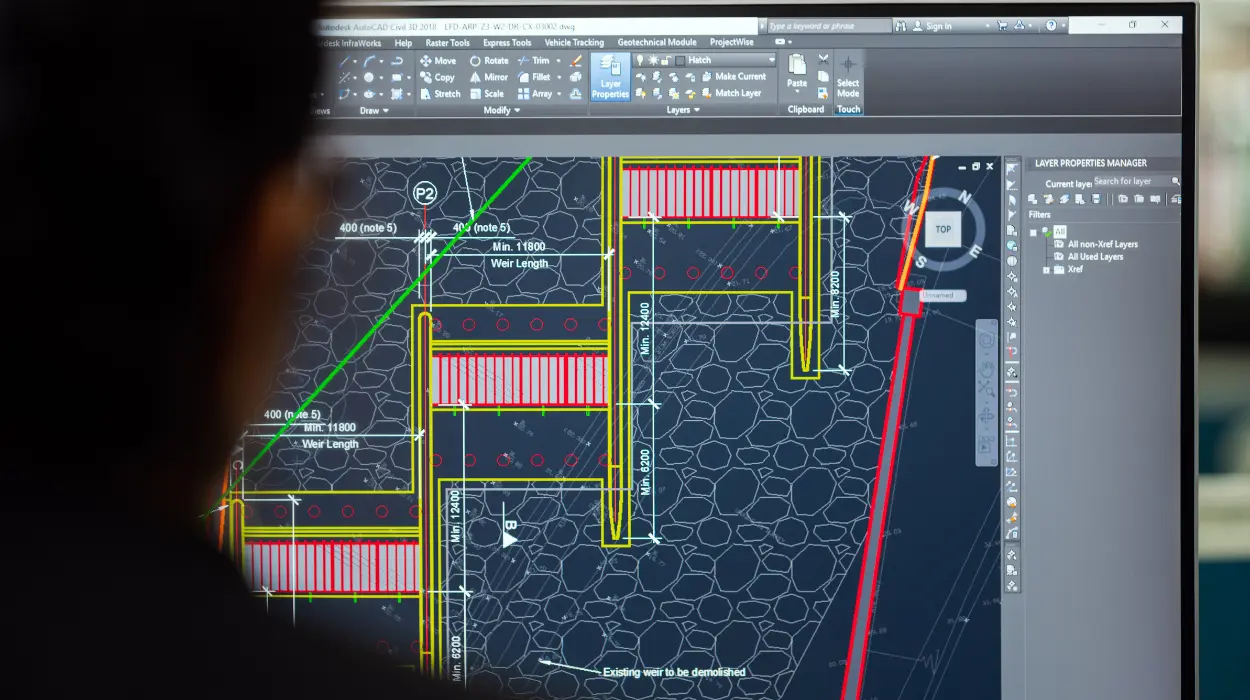
A riser diagram abstracts complex 3D services into a vertical, linear view. It shows stacks, branches, valves, pumps, risers, shafts and key equipment across floors. The diagram omits spatial geometry but records connectivity, elevations, pipe sizes, insulation, pressure classes and control points. In AutoCAD HVAC and plumbing design, riser diagrams serve as the single-source schematic for vertical coordination between disciplines.
Riser diagrams reduce rework. They prevent clashes between structural elements and service shafts. They speed procurement by listing long-lead components and standardising sizes. For HR and L&D decisions, riser-diagram competency maps directly to reduced site change orders and lower installation hours—measurable ROI metrics for training programmes.
Read the awareness-stage primer on fundamentals here:
What Is the Role of Riser Diagrams in HVAC and Plumbing Design? This explains the basic concepts before you evaluate training formats.
How are riser diagrams created in AutoCAD within a training context?
Riser diagrams are created by extracting vertical service routing from plans and sections, modelling connectivity in layers/blocks, annotating levels and components, and validating sequence and sizing against system calculations.
Creation follows discrete steps taught in effective training courses.
- Gather inputs: architectural floor levels, room schedules, equipment list, load calculations, and service entry points.
- Establish levels: define storey elevations and datum lines in AutoCAD so the vertical alignment references match architectural data.
- Use standard blocks and layers: deploy library blocks for pumps, valves, traps and fittings, and consistent layer naming for mechanical, chilled-water, hot-water and drainage systems.
- Draw the backbone: sketch risers as continuous vertical lines showing service stacks. Branches connect where floor-by-floor distribution occurs.
- Annotate: add pipe sizes, insulation, flow direction, control points, and access panels. Include elevation tags for inlets and outlets.
- Link to schedules: create part lists and schedule references in the CAD file so annotations reflect BOM items.
- Validate: cross-check against hydraulic calculations, ventilation schedules and structural penetrations.
In training, these steps match practical exercises. Trainers provide case files, sample building models and calculation outputs. Students practice end-to-end—from reading specifications to producing annotated riser diagrams ready for coordination meetings.
Which AutoCAD tools and workflows are taught for riser-diagram production?
Training covers core AutoCAD commands, block and attribute management, layer systems, dynamic blocks, Xrefs, and industry-specific toolsets or plug-ins for MEP drafting and scheduling.

Key tools and workflows:
- Layer management: segregate services, show/hide annotations, and export layer-based PDFs for different disciplines.
- Blocks and attributes: use intelligent blocks with editable attributes for valves, fittings and equipment to speed drawing consistency and scheduling.
- External references (Xrefs): attach floor plans and sections for alignment while keeping riser diagrams lightweight.
- Dynamic blocks: enable variants of same component (e.g., valve orientations) without redrawing.
- Annotation and tables: link block attributes to tables for material take-off.
- Coordinate systems: align CAD elevation data with BIM or structural models when needed.
- Export and documentation: generate PDFs, DWG subsets and CSV schedules for procurement systems.
Training emphasises reproducible workflows so learners produce consistent deliverables across projects. The course environment trains users to implement CAD standards that HR can adopt as part of company drafting protocols.
How does training compare between AutoCAD-only and BIM-based methods for riser diagrams?
AutoCAD-only training focuses on 2D drafting discipline, layer and block control, and manual coordination; BIM-based training emphasises parametric components, automatic schedules, and clash detection each suit different organisational needs and integration levels.
Comparison points relevant for training decisions:
- Output fidelity: AutoCAD riser diagrams are precise schematics; BIM produces linked 3D models plus automatic extraction of riser views.
- Coordination: BIM gives clash detection and model-based coordination; AutoCAD requires manual cross-checks with sections and other disciplines.
- Speed: AutoCAD workflows are faster for small projects and teams familiar with 2D; BIM scales better for large, complex projects.
- Learning curve: AutoCAD has shorter onboarding (weeks); BIM requires deeper modelling and systems knowledge (months).
- Cost and tooling: BIM implementation requires licence investment and process changes; AutoCAD training uses widely available CAD licences.
- Workforce impact: BIM skills close modern integration gaps where organisations pursue digital engineering; AutoCAD skills maintain efficient delivery where 2D remains standard.
For HR and procurement choices, factor: project complexity (storeys, services density), integration expectations (BIM coordination), and transition plans for workforce upskilling.
Which competencies should a workforce acquire from riser-diagram training?
Competencies include schematic thinking, layer and block standards, annotation discipline, cross-discipline coordination, hydraulic and ventilation basics, and schedule/BOM linkage for procurement and maintenance.
Breakdown of competencies employers should expect after training:
- Schematic literacy: interpret and produce vertical service logic flows with correct symbology.
- CAD standards: apply company layer naming, line weights, and block libraries for consistent deliverables.
- Component specification: identify valves, pumps and fittings by type, size and performance class.
- Coordination skills: reconcile riser diagrams with architectural shafts, structural penetrations and electrical routes.
- Technical calculation awareness: read basic hydraulic and ventilation data to validate sizes and pressure classes.
- Documentation skills: produce O&M-ready annotations and linked schedules for handover.
- Communication: present riser diagrams in coordination meetings and explain design intent to contractors.
These competencies translate directly to performance KPIs: fewer RFIs, lower site rework rates, shorter MEP installation durations and improved O&M handover completeness.
How are riser diagrams used across project phases and organisational roles?
Riser diagrams are used as design-validation tools during schematic design, as coordination artefacts during detailed design, and as installation and maintenance references during construction and handover.
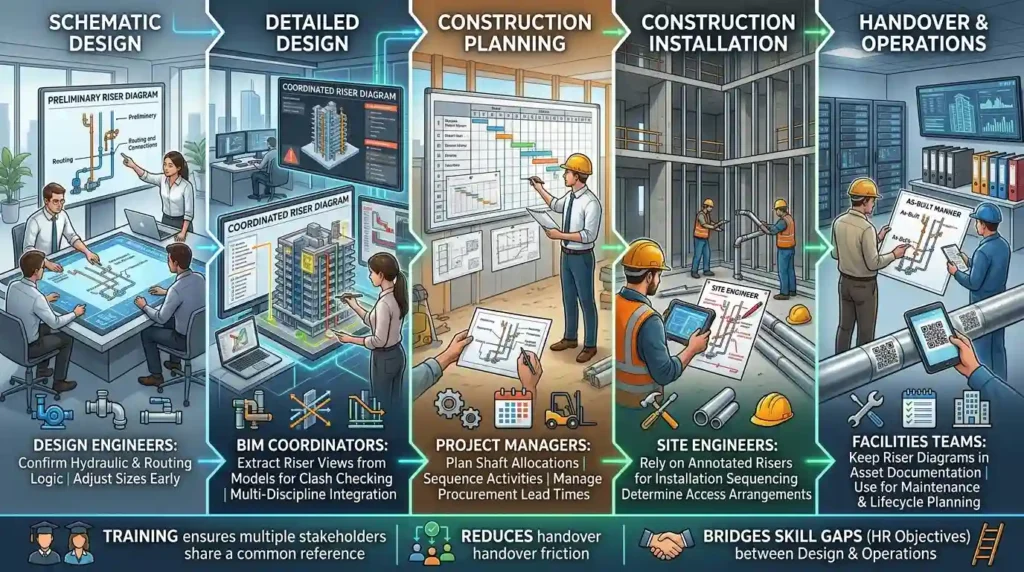
Role-specific uses:
- Design engineers use riser diagrams to confirm hydraulic and routing logic, and to adjust sizes early.
- BIM coordinators extract riser views from models for clash checking.
- Project managers use risers to plan shaft allocations, sequencing and procurement lead times.
- Site engineers rely on annotated risers for installation sequencing and access arrangements.
- Facilities teams keep riser diagrams in asset documentation for maintenance and lifecycle planning.
Including riser diagram deliverables in training ensures multiple stakeholders share a common reference. This inclusion reduces friction across handover stages and aligns with HR objectives to bridge skill gaps between design and operations teams.
What training formats deliver the best learning outcomes for riser-diagram skills?
Blended training combining instructor-led workshops, hands-on CAD labs, and project-based assignments delivers the best outcomes by reinforcing standards, practical techniques and cross-discipline coordination.
Format options and effectiveness:
- Instructor-led classroom: effective for foundational principles and live demonstration; duration typically 1–2 days for basics.
- Hands-on CAD labs: critical for skill acquisition; sessions of 3–8 hours focused on creating riser diagrams from case files.
- Project-based assignments: simulate real B2B scenarios; run over 1–4 weeks and assess deliverables against coordination checklists.
- Virtual instructor-led training (VILT): mirrors classroom benefits with remote access; requires prepared datasets and screen-sharing rigour.
- Self-paced e-learning: supports theory and standard modules but lacks guided practice unless paired with exercises and assessments.
- Mentored on-the-job learning: embeds skills into projects; returns the highest ROI but needs mentor bandwidth.
For HR planning, combine two or three formats. Example: one-day fundamentals (VILT), two-day lab workshops, and a 2-week project assignment. This structure produces measurable performance changes within 4–8 weeks.
What metrics should organisations use to measure training ROI for riser-diagram capability?
Metrics include reduction in RFIs and site change orders (percentage), time saved in coordination meetings (hours), accuracy of BOMs (variance percentage), installation hours per floor (hours), and time-to-competency for trainees (days).
Suggested KPIs and targets:
- RFIs related to vertical services: target a 30–50% reduction within six months.
- Site change orders due to routing conflicts: target a 25–40% reduction per project.
- Coordination meeting time: target a 20% reduction in meeting hours and faster decision cycles.
- BOM accuracy: aim for <5% variance between CAD schedule and delivered materials.
- Installation productivity: measure hours per floor for MEP fit-out; target improvement of 10–25%.
- Time-to-competency: track from course start to validated independent production; target 20–40 working days depending on intensity.
These KPIs support HR decisions on training budget allocation and help quantify business impact for managers and procurement teams.
Discover More from Our Guide Library:
How Does AutoCAD HVAC Training Cover Equipment Room Layout and Clearances?
How Does AutoCAD HVAC Training Teach Coordination with Reflected Ceiling Plans?
How does the AutoCAD HVAC and Plumbing Design Training Course align with workplace needs for riser diagrams?
The AutoCAD HVAC and Plumbing Design Training Course teaches standards-based drafting, riser-diagram workflows, annotation discipline, and schedule linkage—aligning directly with workplace needs for coordination, procurement and maintenance documentation.
Course learning objectives that address organisational pain points:
- Standardise drawing outputs across teams to reduce interpretation errors.
- Provide hands-on exercises that replicate site constraints and shaft coordination.
- Train staff to generate procurement-ready schedules from CAD attributes.
- Prepare trainees for multidisciplinary coordination meetings with clear deliverables.
- Develop documentation suitable for O&M handover, reducing lifecycle costs.
Selecting this course contributes to closing workforce skill gaps in drafting and coordination. It also supports HR objectives for certifying staff, creating consistent onboarding programmes, and improving project delivery metrics.
If your team is ready to evaluate course fit for procurement, read the decision-stage review:
Does Imperial’s AutoCAD HVAC Programme Cover Riser Diagram Production? This resource assesses course scope and readiness for immediate implementation.
What skills will I gain from Imperial Corporate Training Institute’s AutoCAD HVAC and Plumbing Design Training Course?
You will gain skills in drafting riser diagrams, layer and block management, annotation for schedules, and basic hydraulic and ventilation validation. These competencies prepare learners for coordination meetings, procurement-ready BOMs and installation-ready documentation.
Is prior experience with AutoCAD required for the AutoCAD HVAC and Plumbing Design Training Course?
Basic AutoCAD familiarity is recommended but not mandatory; the course provides foundational refreshers before progressing to MEP-specific workflows and riser-diagram production. Employers often pair this course with a short pre-course skills check to set the correct learning track.
How does Imperial Corporate Training Institute measure outcomes for the AutoCAD HVAC and Plumbing Design Training Course?
Outcomes are measured using practical assessments, deliverable quality checks (riser diagrams and schedules), and KPIs such as reduction in RFIs and BOM accuracy improvements. Organisations receive metrics to evaluate time-to-competency and expected impact on coordination and installation productivity.
Which delivery formats are available for the AutoCAD HVAC and Plumbing Design Training Course?
Delivery formats include instructor-led classroom sessions, virtual instructor-led training (VILT), blended workshops with hands-on CAD labs, and employer-tailored on-the-job mentoring. Each format focuses on practical riser-diagram workflows and can be adapted to team schedules and HR upskilling plans.